Showing posts with label cooking. Show all posts

Monday, December 22, 2008

A Different "Twist" on Fudge

The holidays is a time when lots of people make fudge. But if you are tired of the same old chocolate fudge, why not try something different?


Cookies N Cream Fudge


You will need:


16 chocolate cream-filled sandwich cookies, broken into chunks, divided


1 can (14 oz) sweetened condensed milk


2 tablespoons butter


2-2/3 cups vanilla chips


1 teaspoon vanilla extract

What to do:


Coat an 8-in. square baking pan with nonstick cooking spray. Place half of the broken cookies in pan. In a heavy saucepan, combine milk, butter and chips; cook and stire over low heat until chips are melted. Remove from heat; stir in vanilla. Pour over cookies in pan. Sprinkly remaining broken cookies over top. Let set until cooled.

-----------------------------------------------------------


I think these are a bit sweet, but my husband loves them and if you love cookies n' cream, why not try them out for yourself?

Friday, August 29, 2008

Make Yourself an Easy, Yummy, Healthy Treat

Blueberry Smoothie

1 cup plain soymilk
1 cup frozen blueberries

Blend.

Pour into your glass.

Enjoy.

Yum!

Went back to the garage sale that I mentioned yesterday this morning. The Tiffany necklace was still there. I bought it for $5! I actually wore it today, but might try to sell it on Ebay? We'll see.

Took the kids in for portraits at Pennys. They turned out real cute but we were there about 3 hours. The woman helping us choose photos and check out was training a new employ and it took 3 times as long as normal to get to us. The kids had a heyday as I promised them a cookie if they did well at their photo shoot. Good thing we left the together shots till the end. Because they weren't very good to each other then. Overall they were real good. They got to eat chicken mcnuggets, a rare occurance, both each got 2 cookies and Ella got a Hello Kitty crystal necklace and a sequin strawberry hairclip (50% off, yeah!) The sales were big time crazy. I got a really nice frame for $8, an indoor/outdoor thermometer complete with atomic clock for $10 (our current one got stuck in celcius and we can't change to farenheit, even when we flip the switch in the back to go to F, a table top clock for the guest room for half off and 2 pairs of shoes for me for $14, one pair being Keds! Good thing I didn't deliberately look for anything because I'm sure I'd find a ton more deals.

Jason put the tent up in the back yard tonight. He and Miles are sleeping out there. Ella was going to too. Until we found the holes she poked into the screen on her windows. Her punishment was that she was not allowed to sleep in the tent.

We have a pretty packed weekend ahead. So I'm sure there will be a lot to report back next week. And I still have photos in the camera to share from this week. Until then...

Wednesday, May 28, 2008

Scone Day

Beautiful Bouquet in Juice Glass

I like scones, good scones that is. Last year I think in March or April we stayed at a Bed and Breakfast in Cambridge, Wisconsin and the couple who owned the house were wonderful cooks. One of the items they made that was excellent was orange current scones. Later I requested the recipe and she gave it to me!


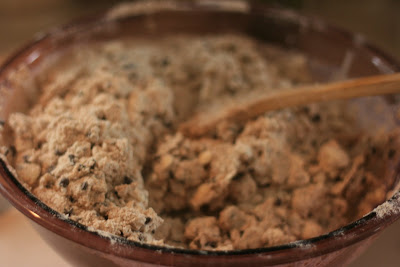
I made them quite a bit at first, but haven't in a while, until today. Because I needed something to bring to my daughter's preschool end of year picnic. I took some photos while making them so I could present the recipe to you today. Though for the first time I made a different flavor, cinnamon and chocolate chips and I also used whole wheat flour since my daughter can't have white flour at this time (long story) and I doubled the recipe.

Oh, by the way, these are the BEST SCONES EVER!!!

Preheat oven to 375. Line a baking sheet with parchment paper.

Combine:
2 3/4 c. all purpose flour
1/2 c. sugar
2 tsp baking powder
1/2 tsp salt


Blend in 12 T. cold unsalted butter, cut into 1/2 inch cubes.


Add 1 c. dried currants
1T orange zest
1 c. heavy cream, cold


Divide dough into two balls, form each into a circle about 6 inches wide and 1/2 inch high. Divide circle into 6ths with a knife (like cutting a pizza)


Brush each wedge with an egg blended with 1 T water.

Sprinkle with coarse sugar.

Bake for 20 minutes. Cool briefly and serve warm.


SUBSTITUTIONS (instead of currants and orange zest):

1 cup blueberries and T lemon zest

Replace 3T flour with 3T unsweetened cocoa powder, omit zest and add 1 cup mini chocolate chips

Use 1 cup mini chocolate chips instead of dried fruit. Omit zest and add 1/2 tsp cinnamon

***TIPS***

Combine all ingredients up to zest, cover and let sit in fridge for 12 hours, this lets the oils from the citrus infuse through the dry ingredients

FOLD the cream into the flour, folding is preferred over stirring, just until blended

Bake on cookie sheet lined with parchment paper

Leave room between each scone as they do rise during baking

Adjust baking time to your oven sometimes 20 min is too much, sometimes not enough.

ENJOY!

Wednesday, April 9, 2008

Sweet Potato Fries - Heathly Alternative to French Fries

I first experienced Sweet Potato Fries at the Heartland Cafe in Chicago's far north Rogers Park neighborhood. To describe this restaurant and all its nuances would be an entirely different post. Let's just focus on the fabulous side dish.

I fell in love with these goodies and they way they serve them, with marinara sauce instead of ketchup. Last week I attempted to replicate them for the second time in several years. I don't know what it was, but I think they turned out better this time. I may have added a little more of the spices than the recipe called for.

So I started off with two gigantic sweet potatoes. Unfortunately it is hard to tell how big the are in this photo. Normally the recipe calls for four sweet potatoes.


The oven was turned on to preheat to 400 F.

I peeled the potatoes and them cut them into fries.

The cut potatoes were placed into a microwave-safe dish with 1 TBSP water and cooked in the microwave for 5 minutes on high.


The liquid was drained and the fries were tossed with 2 tsp Italian seasoning, 1/2 teaspoon lemon pepper (I added quite a bit more), salt and pepper to taste and 2 tablespoons of olive oil.

Fries were arranged on a baking sheet in a single layer. They were baked for 30 minutes turning them over once until they were crispy on the outside.


Cooled and served with some great pasta sauce, the SWEET POTATO FRIES were a PERFECT side for Blue Cheese Burgers on whole wheat buns!

Wednesday, November 14, 2007

Recipe

My mom wanted this recipe, so since I typed it all out, I thought I'd post it here to. This is from the Sept/Oct issue of Midwest Living. I made this for our Halloween gathering.

Sour Cream Pumpkin Bars

1/2 cup butter, softened
1 1/3 cups sugar
1 1/2 tsp baking powder
1/4 teaspoon baking soda
1/4 teaspoon salt
2 eggs
1 cup canned pumpkin
1/2 cup dairy sour cream
1/4 cup milk
1 tsp vanillla
1 1/2 cups all-purpose flour
1/2 cup whole wheat flour
1 cup chopped pecans or walnuts
Browned butter frosting (recipe follows)
Chopped pecans or walnuts for topping (optional)

1. Grease a 15x10x1-inch baking pan; set aside.
2. In a large mixing bowl, beat the butter with an electric mixer for 30 seconds. Beat in sugar, baking powder, baking soda and salt until combined. Add all-purpose and whole wheat flours; beat until combined. Stir in 1 cup nuts.
3. Spread the mixture evenly into a prepared baking pan. Bake in a 350 degree oven about 25 minutes, or until a wooden toothpick inserted near the center comes out clean. Cool in pan or wire rack.
4. Prepare the Browned Butter Frosting as directed; spread over cooled bars. If you like, immediately spring the frosted top with additional chopped pecans or walnuts. Cut into bars. Makes 48 bars.

Browned Butter Frosting: In a small saucepan, heat 1/2 cup butter over low heat until melted. Continue heating until the butter turns a light brown. Remove the saucepan from heat and transfer butter to a medium mixing bowl. Add 3 cups powdered sugar, 2 tablespoons milk and 1 teaspoon vanilla. Beat with an electric mixer until combined. Beat in additional milk, 1 teaspoon at a time, to make a spreadable frosting. Use immediately. Makes about 1 cup frosting.

Tuesday, November 13, 2007

Holiday Recipes

20071112_3963

As promised, here it the final recipe card. Unfortunately it is a little hard to see the green border. I looked for laminating at Staples, but the self laminating system (the one you don't need to buy a $99 heat sealer to work) was about $9 for only 5 - 4 1/2 x 6 sheets. Yikes! Maybe I'll look elsewhere! Thanks for the idea Sarah! I'll keep looking for some that are more affordable!

Monday, November 12, 2007

Must Post

I haven't mentioned it until now, I signed up for NaBloPoMoNa in which I have to post EVERYDAY for the month of November to be eligible to win a prize. I'm not real sure on the details, but I'm trying to post everyday.

First of all, I feel foolish. I thought a cookie exchange was today and had baked DOZENS of cookie yesterday and bagged them all up today. Found out it isn't until Dec. 10. Luckily my friend called to tell me. Otherwise I would have been at the hostess' door REALLY feeling foolish!

The same friend who is a native Spanish speaker offered to have my kids over and ONLY speak Spanish to help them to learn the language. YAY. She said I could learn too.

Before I get around to taking a photo of the progress on my scarf, I think I will have it finished!

I bought the Turkey today.

Ella is almost done with her K-1st grade Math book. She is 3 going on 4. I am wondering if I buy the next book, or just keep working with her on the stuff she already knows.

Does anyone know how to laminate 3x5 cards? Is there a way to do it at home. I made up the recipe cards for the cookies exchange and they look really cute, I'd just like to make them water and cookie dough proof! Would clear contact paper work?

OK, off to make some tea and either read or knit myself to sleep.

By the way, there are some REALLY cute recipe card templates you can use in MS Word, either 3x5 or 4x6 here. Here's the one I used, then used rubber cement to attach them to a slightly bigger green background. They turned out so sweet. When I upload photos, I'll post one.

Friday, October 12, 2007

Recipe

Sorry I didn't include the recipe. I've been sick and didn't feel like transcribing it at the time.


Lemon on Lemon Shortbread Cookies


1 1/4 cups all-purpose flour
3 tablespoons sugar
1 1/2 teaspoons finely shredded lemon peel
1/2 cup butter
Lemon Icing (recipe follows)
Coarse decorating sugar (optional)

1. In a large mixing bowl, mix flour, sugar and lemon. Using a pastry blender, cut in butter until mixture resembles fine crumbs and starts to cling. Knead gently until dough forms a ball.
2. On an ungreased cookie sheet, pat dough into an 8-inch circle. Make a scalloped edge. Cut into 16 wedges. Leave wedges in circle (do not separate).
3. Bake in a 325 F oven about 25 minutes, or until edges start to brown and center is set. Recut circle into wedges while warm. Cool on cookie sheet 5 minutes. Remove and cool on wire rack.
4. Make lemon icing; drizzle over wedges. Sprinkle with coarse sugar, if you like. Makes 16.
Lemon Icing: In a small bowl, combine 1 cup of powdered sugar and 1 tablespoon lemon juice. Stir in additional lemon juice, 1 teaspoon at a time, until icing reaches a drizzling consistency.

From Midwest Living October 2007

Thursday, October 11, 2007

Lemony Sunshine


Yesterday was a dreary day, not to mention I felt sick (still do). We had company coming over that night and I had to make some goodies. So I found a recipe for Lemon on Lemon Shortbread Cookies in the Sept/Oct issue of Midwest Living magazine. What really makes it is the lemon juice filled glaze. We are dieting, but I tasted a small piece from a broken one and it was DELICIOUS! They have several other yummy looking cookie recipes in this issue too.


No, I do not own a pastry blender.


Not sure why they have you make scallops, but they look pretty before you cut up the dough into wedges.


The presentation. I finally get to use this platter.


Baking makes for a happy kitchen.

Tuesday, July 31, 2007

OK, Here We Go.... Bok Choy


We have a standing order for organic fruits and vegetables from Timber Creek Farms every four weeks. We pre-ordered the Fruit and Vegetable box. It usually comes with quite a plethera of fresh produce and would be so much more expensive than TCF's prices if I bought it all at the local grocery store non-organic! The only catch is that you don't get to choose what you get. There is an option where you are told ahead what is coming and you can order more of what you like but I think that might cost a bit more. Anyway, we have received some foods that we have never seen or at least never eaten before. For a little while this time we were totally clueless about one of the veggies in our box. Um, what is it some sort of celery? A lettuce? Collard greens? Well somehow I finally realized it was bok choy. At that point I searched around for the receipt that comes with the box because I know they often send recipes for items that may be unfamiliar to some people. Lo and behold, there it was, a recipe sheet for bok choy. So we decided to try out the "Bok Choy and Chicken".

Serves 4-6

1 head Bok Choy washed at cut crosswise in 1 inch pieces
4 boneless, skinless chick breast halves in 1 inch pieces
3-8 cloves garlic, minced (depends on your taste)
1/4 cup dry sherry
1/4 cup soy sauce
2-3 Tbs. Peanut or Vegetable oil
2 Tbs. Cornstarch dissolved in cold water

Stir fry the garlic and chicken in the oil until there is no more pink meat on the chicken. Add bok choy and continue cooking for 3 min. Add the sherry and soy sauce and bring to a bubble. Pour a little of the cornstarch mixture at a time and stir to check the thickness of the sauce. Serve over rice.


The verdict... It was DELICIOUS! Very Asian tasting.

Monday, July 16, 2007

Mixed Nut Bars


Once in a while, as I pull them out, dust them off and use them I will post recipes that I have found to be real crowd pleasers. Last night I went to an event through an area MOMS club that I joined this year. I am very quiet around people I don't know very well, but I just need to get to warm up to them and I will be right in there. Last night was a good opportunity (without our kids) to get to know some of the ladies a little more. The highlight of the night was to find out that one of the members and I grew up on the SAME STREET and graduated just a year apart from the same high school. Though I must admit, I am very sad that I didn't know here then. Our town and our HS was/is huge and it was/is hard to get to know everyone!

Anyway, for the gathering I made MIXED NUT BARS which my mom originally found in a "Taste of Living" recipe magazine. Here is the recipe:

MIXED NUT BARS
-Bobbi Brown, Waupaca, Wisconsin

1-1/2 cups all-purpose flour
3/4 cups packed brown sugar
1/4 teaspoon salt
1/2 cup plus 2 tablespoons cold butter or margarine, divided
1 can (11-1/2 ounces) mixed nuts
1 cup butterscotch chips
1/2 cup light corn syrup

In a bowl, combine flour, sugar and salt. Cut in 1/2 cup of butter until mixture resembles coarse crumbs. Press into a greased 13 x 9 x 2 inch baking pan. Bake at 350 degrees F for 10 minutes. Sprinkle with nuts. Melt butterscotch chips. Add corn syrup and remaining butter; mix well. Pour over nuts. Bake for 10 minutes. Cool. Yield: about 3-1/2 dozen


My next recipe will probably be for "Chocolate Surprise". The next cooking club through the MOMS club that I will be able to attend in August will be doing "desserts" (or so I hear!)

Blog Widget by LinkWithin